武装突袭3

武装突袭3

149 个评价
XallZalls Ultimate Script Collection
由 XallZall 制作
Collection of Various Scripts, ready for use with Eden Editor.
This is the scripting equivalent of Instant Ramen.
3
5
4
4
2
   
奖励
收藏
已收藏
取消收藏
Introduction
Arma 3 Eden Editor Script Collection - By XallZall
Designed for the Steam Overlay and for quick access to various scripts.


"Talk is cheap. Show me the code." - Linus Torvalds

I originally created this for myself as I collected, modified and created scripts myself over the years so that I can quickly find or remind myself how something works or needs to be done.
I figured its worth sharing and its allot more easy for myself as well to simply open my guide while I am working on a custom mission.

If you want quick and dirty scripts that are ready for use, or are just simply lazy to figure it all out, you have come to the right place!

Please note:
  • As I am by no means a coding/scripting expert and variations and case uses for custom user scenarios are essentially endless:
    I will NOT be answering any questions regarding the use of these scripts!

  • I will NOT modify any existing scripts that are posted here by request, the only time I will is if I feel the need to.
    I write this because the ways or methods of a script can be done are endless, and you may know a better way to do it, which is great! I just don't want to constantly alter things here.

  • Many codes here are only possible thanks to the lads over at https://forums.bohemia.net/
    In no shape or form do I want to pretend that I created all these codes, while I have written a few myself, the bulk are modified codes that come from bohemia's forums.

  • You may suggest scripts, if I understand how it works and find it a useful addition I may add it to this collection.

  • I will be actively adding in new codes and scripts from time to time, so you may discover new ones in the future when revisiting this guide.


With that said, I have made, documented and modified these scripts in a way that for the most part its a simple case of Copy-and-Paste with some minor tweaking that is required on your end for your personal case use.
Instructions Manual / Important Info
  • I have designed these scripts in a way that almost all of them are done within the Eden Editor, so no need for description.ext or init.sqf in most cases.

  • Whenever I write Unit ID or something with ID I am referring to the Units Variable Name.

  • The codes listed in this guide follow the format seen below, but at times due to the text length it may shrink, so to have a better overview of the codes, I would recommend to copy-and-paste the codes into notepad++ or some other text editor.


    Func = { CODE; };


  • Since there is a fair amount of code here, take advantage of using CTRL+F to search a specific code.

  • Usually whatever is CAPITALISED means that you should alter or change those to your needs.

  • Each script code has either [Unit Init] or [Trigger] before it, this is pretty self explanatory, but it is worth mentioning that the Unit Init can also be that of an Object, ex. a Box or a Vehicle.

  • You will learn that I am allergic to using .sqf files, I really dislike constantly tabbing out, as a result almost all of the code here will be exclusively used within Eden Editor itself. However, note that if you wish to use certain codes inside a sqf file, you can cut out function codes and use nul=execVM "scripts\YOURSCRIPTS.sqf"; to call them instead, as in allot of cases I converted the .sqf scripts into functions.

  • Check out at the very bottom of this guide the in Non-Coding Related the Tools section, as I posted there some external sites that should come in handy and prove to be helpful with the mission creation process.
[Unit Init] Action using a pressed key
This is a template for activating another code using a custom keyboard key that you set.

Code:
[] spawn { waitUntil {!isNull(findDisplay 46)}; (findDisplay 46) displayAddEventHandler ["KeyDown", { if(_this select 1 == YOURKEY) then { WHATEVERCODEYOUWANTTOACTIVATE; }; }]; };
Notes:
Change YOURKEY to whichever key you want, see the link in extras to find the keycode for the keyboard key you want.
WHATEVERCODEYOUWANTTOACTIVATE, place here whatever you code you want to execute when the key is pressed.


Extras:
To see the key listings go visit this page:
https://community.bistudio.com/wiki/DIK_KeyCodes
[Unit Init] Action using a pressed key (If Statement Version)
Important! This has the "J" key set. Check below for the Extra notes that provides a link for other keys.
Just replace the hint with code that you wish to execute.

Code:
[] spawn { waitUntil {!isNull(findDisplay 46)}; (findDisplay 46) displayAddEventHandler ["KeyDown", { if(_this select 1 == 0x24) then { hint "LOL This is a message!!!"; }; }]; };
Notes:
0x24 in the code above is the identifier for the "J" key, to change that, check the link in the Extra section below this comment, search for the J key which is 0x24 and find a different one which you want and replace it.

Extras:
https://community.bistudio.com/wiki/DIK_KeyCodes
[Unit Init] Animations Medical
This ones a very common animation used in relation to anything medical and is very useful as it changes dynamically depending on the stance, standing, kneeing or being prone.
In addition, when the animation ends, the player or AI that is in it exits it after its complete.
Lasts around 7 seconds.

Code:
this playActionNow 'Medic';
Notes:
On its own its just a animation, but you can combine this with for example an add action to call it, and combine it with healing codes.
[Unit Init] Animations (New Method)
Units with this code will break their animation seamlessly upon detecting hostiles.
Replace "SIT_LOW" to something else, found in the provided link below.


Code:
[this, "SIT_LOW", "ASIS"] call BIS_fnc_ambientAnimCombat;
Notes:
Breaks out of animation upon detecting hostiles.
Seamless, natural transition into combat mode.
For a list of Animations go to:
https://community.bistudio.com/wiki/BIS_fnc_ambientAnimCombat


Extras:
I couldn't figure out how to re-enter the ambient animation after the unit breaks the ambient animation to engage enemies. So be wary of that when using this code.
[Unit Init] Animations (Old Method)
Units that have this code will be set in an animation, they will not break from it even if they detect hostiles unless the "Extra Code" below is also put in their Init field. If the Extra code is used, it won't be seamless (very clunky infact), but this method has more animations that can be used than the newer one posted above.

Change "WATCH" to something else from the link provided below.


Code:
[this, "WATCH", "ASIS"] call BIS_fnc_ambientAnim;
Notes:
This older method has the advantage to use more animations, but the downside is that its not seamless like the new method; the animation will abruptly change and it looks akward.
For a list of Animations go to:
https://community.bistudio.com/wiki/BIS_fnc_ambientAnim


Extras:
To stop an animation after a enemy has been detected use:
{ waitUntil {_this call BIS_fnc_enemyDetected}; _this call BIS_fnc_ambientAnim__terminate; };
[Unit Init] Attaching an Object to another Object
First make sure to name the object that you want to attach to, afterwards alter the coordinates.
With this you can make some crazy combinations, but this method does not include any rotation options.


Code:
this attachTo [OBJECTNAMETOATTACHTO, [0, 0, 1]];
Notes:
For a better placement of the object, without having to visit Eden Editor after each input,
Give the object your attaching a name ID instead of using "this",
Press play, and then press escape once your in the world, and in input the code and initialise it locally, changing the values.
The XYZ's are as follows: First is left and right, second is front and back, and 3rd is height.
[Unit Init] Arsenal (Equipment Menu)


Code:
0 = ["AmmoboxInit",[this,true]] spawn BIS_fnc_arsenal;
Notes:
Place any object and set the code in its init field.
[Unit Init] Arsenal / Limited to RHS RUS & USA
!Important: Naturally you need RHS mods for this to work.

Code:
[this, 0] call RHS_fnc_virtualAmmoBoxRus; [this, 0] call RHS_fnc_virtualAmmoBoxUSA;
Notes:
You can use one or the other or both.
Also the arsenal will show up twice, but this should not be an issue.
[Unit Init] Battlefield Tank Control (1 Player Tank Control)
If you want to control a tank or any vehicle solo like in the Battlefield games, use this code.


Code:
this call { if (isServer) then { _this lockTurret [[0], true]; _this lockTurret [[0,0], true]; _this lockCargo true; _this addMPEventHandler ["MPKilled", { if (isServer) then { _d = driver (_this select 0); _g = gunner (_this select 0); if (!isNull _d) then {deleteVehicle _d}; if (!isNull _g) then {_g setDamage 1}; }; }]; }; if (!isDedicated) then { _this addEventHandler ["GetIn", { enableSentences false; _tank = _this select 0; _unit = _this select 2; _unit allowDamage false; _unit action ["EngineOn", _tank]; _unit action ["MoveToGunner", _tank]; _tank lock true; _tank switchCamera "EXTERNAL"; _tank addAction [localize "str_action_getout", { _this select 0 removeAction (_this select 2); _this select 1 action ["GetOut", _this select 0]; }, "", 3, false, true, "GetOver"]; _tank spawn { waitUntil {!isNull gunner _this}; _ai = createAgent [ typeOf gunner _this, [0,0,0], [], 0, "NONE" ]; _ai allowDamage false; _ai moveInDriver _this; }; }]; _this addEventHandler ["GetOut", { _tank = _this select 0; _unit = _this select 2; deleteVehicle driver _tank; _unit allowDamage true; _unit action ["EngineOff", _tank]; _tank lock false; enableSentences true; }]; }; };
Notes:
Just paste this code into a vehicles init field.
[Unit Init] Bullet Tracers (Penetration Values)
Be careful using this code, as it causes serious lag if there are too many lines drawn.
Also note that this somehow does not work unless you "Stop" the Bullet Tracers first.
So first run the stop code followed by the actual code to run it.

Update: It may work without having to run the stop script first but if it does not then just use the stop script.


Code:
[player] call BIS_fnc_traceBullets;
Alt Code:
[player, 200] call BIS_fnc_traceBullets;
Notes:
To stop it use:
BIS_tracedShooter = nil;
Also use this code before using enabling the bullet tracers for it to work.
In the Alt Code, the numerical value (200 in the example above) is the bullet amount to be traced.
[Unit Init] Change Face
A simple script to change the face of a Unit, this is useful if you want a player to have a particular face, for a story or narrative mission, as by default the users custom characters face is applied to the selected playable unit.


Code::
this setFace "FACE_NAME";
Notes:
In the units attributes, go to the "Object: Identity" section, there select a face and press okay, you can then preview the face in eden editor.
Once you found the face you want, go again back to the Identity section and hover your mouse over the face, there will be 2 lines of information, take the lower one and replace FACE_NAME with that face name.
[Unit Init] Check Ammo With Button Press
Use this code to check your ammo count in your weapons magazine as hint.
The key input for this code is ALT+R
Check the notes below if you want to change the key inputs to something else.

Code:
[] spawn { while {sleep 1.0;alive player} do { Mag = player ammo primaryWeapon player; findDisplay 46 displayAddEventHandler ["KeyDown", { params [ "_display", "_keyCode", "_shft", "_ctr", "_alt" ]; private _buttonDisabled = false; private _blockInput = { _ButtonDisabled = true; }; if (_keyCode isEqualTo 0x13) then { if (_alt) then { hint format ["Magazine Count: %1", Mag]; call _blockInput; }; }; _buttonDisabled; }]; }; };
Note:
The current configuration for this code is ALT+R
R is 0x13 (See the Extras Section for more info on this)
And _alt tells the script to use ALT.
Just above the hint message you will see "if (_alt) then" you can change there the alt to _ctrl or _shft.
Also important to point out is that the sleep here is set to 1.0, meaning the ammo check will happen only every second. You can lower this (for example to 0.1 or even 0.01) if you want a more smoother ammo check, but if you dont check your ammo count to often then its not really a must to lower this value.

Extras:
Use this site if you want to use and find different keys.
"R" = 0x13 found under the Alphabet Keys Section.
https://community.bistudio.com/wiki/DIK_KeyCodes
[Unit Init] Clear Cargo Inventory
You can use this for ammo crates or vehicles.


Code:
clearWeaponCargoGlobal this; clearMagazineCargoGlobal this; clearItemCargoGlobal this; clearBackpackCargoGlobal this;
Notes:
You can delete parts of this code, to remove only certain types of equipment.
Using the code as it is will remove everything.
[Unit Init] Delete Unit or Prop
A simple code to delete something.

Code:
deletevehicle OBJECT_NAME;
Notes:
You can change OBJECT_NAME to "this" instead if you dont want to bother with giving the prop a ID.
[Unit Init] Force First Person View
Makes the player go back into First Person View if they try to go to 3rd Person.


Code:
0 = [] spawn { while {time<30000000000000} do { sleep 0.05; if (cameraView == "EXTERNAL") then { vehicle player switchCamera "INTERNAL" } } };
Notes:
Set this into a playable Units init field.
[Unit Init] Force Walk
This one is very simple and more for cinematic scenes or to have players walk during a narrative story scene.
Also pretty handy for a Zeus.

Code:
player forceWalk true;
Extra:
To allow running again, set true to false.
You can change "player" to "this" instead when putting it into a AI's init field.
[Unit Init] Lock / Unlock Vehicle
Here is a quick and simple one to lock or unlock a locked vehicle.

Code
this lock true;
Note:
You've guess it, set lock to false to unlock.
[Unit Init] Prevent Player Instant Death
Place this code into a playable units Init field to prevent them from dying instantly from critical injuries, such as head shots.
This is useful for narrative missions, or where you simply want the players to have more of a chance to heal each other as no one can die instantly.
They may get knocked out and go unconscious but they wont get killed.

Two versions of this, for default arma and Project Injury Reaction.

Default Version:
Code:
DamageSwitch = 5; this addEventHandler [ "HandleDamage", { _unit = _this select 0; _damage = _this select 2; if (_damage > 0.9 && DamageSwitch >= 0 ) then { DamageSwitch = DamageSwitch - 1; _damage = 0.8; }; _damage; } ]; this addAction [ "Heal self", "(_this select 1) setDammage 0, this removeItem 'FirstAidKit', DamageSwitch = 5, this playActionNow 'Medic'", nil, 6, true, true, "", "(getDammage _target) != 0 AND _this == _target AND 'FirstAidKit' in (items _this)" ];

Project Injury Reaction Version:
Code:
this addEventHandler [ "HandleDamage", { _unit = _this select 0; _damage = _this select 2; if (_damage > 0.9) then { _damage = 0.8; }; _damage; } ];
Notes:
Default Version:
DamageSwitch = 5; This here controls the immortality, the higher this value the longer the player becomes immortal, the player will still get knocked down and will be injured but wont die.
5 is usually enough to just survive a fatal gunshot, but mines and rpgs, larger weapons will still kill a player. Set it to around 15 to survive mines and rpgs, and 25 for withstanding a satchel charge explosion.

Using this method, you want to use the "Self Heal" addAction instead of the regular heal, as this will reset the DamageSwitch(If you take damage, the DamageSwitch will get less).
The Self Heal will only work if he player has a First Aid Kit, and once Self Heal is used it will use up one First Aid Kit.

Project Injury Reaction Version:
In this version, the player becomes immortal at all times, there is no way that the player can die, but since Project Injury Reaction has a bleed-out and unconscious mode, it means that the player will be knocked out, and if untreated will bleed-out and die that way.
[Unit Init] Put weapon on back (Using a Custom Defined Key)
Important! This uses the "5" key.
No idea why this is so complex but I could not find a more simple way.


Code:
[] spawn { waitUntil {!isNull(findDisplay 46)}; (findDisplay 46) displayAddEventHandler ["KeyDown", { if(_this select 1 == 0x06) then { _Holster_Weapon_ctrl = (_this select 0) displayCtrl 9001; if(isNull(_Holster_Weapon_ctrl)) then { _Holster_Weapon_ctrl = (_this select 0) ctrlCreate ["RscText", 9001]; _Holster_Weapon_ctrl ctrlSetPosition [SafeZoneXAbs, SafeZoneY + (SafeZoneH - 0.05) / 2, 0.2, 0.03]; _Holster_Weapon_ctrl ctrlSetFontHeight 0.03; _Holster_Weapon_ctrl ctrlSetText "Weapon Holstered"; _Holster_Weapon_ctrl ctrlShow false; _Holster_Weapon_ctrl ctrlCommit 0; }; _shown = ctrlShown _Holster_Weapon_ctrl; player action ["SWITCHWEAPON",player,player,-1]; waitUntil {currentWeapon player == "" or {primaryWeapon player == "" && handgunWeapon player == ""}}; _Holster_Weapon_ctrl ctrlShow !_shown; }; }]; };
Notes:
If you want to use a different keyboard key than "5", replace "0x06" found in the code with something else, use this link to find the key inputs:
https://community.bistudio.com/wiki/DIK_KeyCodes

0x06 is 5, found under the Numeric Keys section in the link above.
[Unit Init] Remove Map
Useful if you use premade equipment sets and just want to remove the map without having to go modify those sets.


Code:
this unassignItem "itemMap";
Notes:
Set this into a playable Units init field.
[Unit Init] Set Height
A simple script that I used often in ARMA2 that will set the players, AI's or objects height upon activation.


Code:
this setPos [getPos this select 0, getPos this select 1, HEIGHT];
Notes:
Since we can set height with Eden Editor, this may seem at first somewhat pointless, but the advantage of using this code is with combination of spawning in things, so imagine spawning in a helicopter, using this code we can set the initial starting height.
[Unit Init] Set unit as Captive
Putting this code into a units Init Filed will make them put up their hands and surrender.


Code:
this setCaptive true; this action ["Surrender", this];
[Unit Init] Stip Soldier Clean
This will empty the entire inventory of a soldier.


Code:
removeAllWeapons this; removeAllItems this; removeAllAssignedItems this; removeUniform this; removeVest this; removeBackpack this; removeHeadgear this; removeGoggles this; removeAllContainers this;
Notes:
Pick and mix what you want to remove. If you use all of the code, the player or ai will be completely stripped clean.
[Unit Init] Static Humans
This is useful for testing, or cinematic scenes.


Code:
this disableAI "Move"; this setunitpos "UP";
Notes:
Copy and paste that into the target units init field.
It will disable movement and make them stand upright.
[Unit Init] Toggle Lights / Campfire
This ones useful to turn the lights on or off from street lamps or camp lamps etc.

Street Lights / Lamps Version
Code:
this switchLight "OFF";
Alt Code:
this addAction ["Turn Light On", {LAMP_ID switchLight "ON";}]; this addAction ["Turn Light Off", {LAMP_ID switchLight "OFF";}];

Campfire Version
Code:
OBJECT_ID addAction ["Campfire On", {CAMPFIRE_ID inflame true;}];
Notes:
The first code here will turn a light off, change OFF to ON if you need it the other way around.
The Alt Code will give you a addAction menu to toggle the light, this is useful for spot lights or small lamps, but you must give each Lamp a unique ID, so change LAMP_ID for each lamp and change the ID in the addAction code itself using this code.
The campfire version is set to true, to turn a burning fire off, set it to false.
[Unit Init / Group Leader] Patrol
Important: Make sure this is in the Group Leaders Init field, not to be mistaken with the Groups Init field. Has to be in the actual soldiers init field.


Code:
[group this, getPos this, 200] call BIS_fnc_taskPatrol;
Notes:
Set the numerical value for the patrol radius in meters. This examples uses 200 meters.
[Unit Init / Group Leader] Place Soldier into Buildings
Important: Make sure this is in the Group Leaders Init field, not to be mistaken with the Groups Init field. Has to be in the actual soldiers init field.


Code:
if (isServer) then { _units = units group this; _house = nearestBuilding this; _house = _house buildingPos -1; _house = _house call BIS_fnc_arrayShuffle; if (count _units > count _house) then {_units resize (count _house);}; { _x disableAI "PATH"; _x setUnitPos selectRandom ["UP","UP","MIDDLE"]; _x setPos (_house select _forEachIndex); _x addEventHandler["Fired",{params ["_unit"];_unit enableAI "PATH";_unit setUnitPos "AUTO";_unit removeEventHandler ["Fired",_thisEventHandler];}]; } foreach _units; };
Notes:
This code puts soldiers into the nearest building to where ever they are situated.
So a clever way to randomise which house they will go into, when thinking of placement of an entire area, set in their properties the placement radius to a higher value, and they will be randomly spawned somewhere, and then garrison the building closest to them there.
[Unit Init / Group Leader] Random Group Spawn Location
Important: Make sure this is in the Group Leaders Init field, not to be mistaken with the Groups Init field. Has to be in the actual soldiers init field.

Unlike Placement radius, which will randomise the placement of each soldier in a unit,
using this code will randomly place the entire squad together in the same random area.

Code:
_pos = [[[getPos this, NUMBER]]] call BIS_fnc_randomPos; {_x setPos _pos;} forEach (units (group this));
Note:
Change the NUMBER to your liking, the number input is in meters.
[Unit Init + Game Logic] Make AI Fire at selected Target
For this to work, you will also need a Game Logic, found under:
Systems Tab (F5) -> Logic Entities -> Objects
In there you will find the Game Logic, place it somewhere and give it a Variable Name, the code below uses "GL1" as the Game Logics Variable name.

Naturally you will also need to give the target to be shot a Variable Name.

This is a handy script especially if you are making shooting ranges as the AI can shot at defined targets with a set time interval that you can determine.

Code:
null = this spawn {_this dotarget TARGET_1; sleep 0.5; while {alive TARGET_1 and alive _this} do {sleep TIME; GL1 action ["useweapon",vehicle _this,_this,0]; }};
Notes:
TARGET_1 is the target ID, TIME is the number of seconds between shots.

Extras:
Works fine in Vehicles as well, provided:
1. The code is given to the gunner.
2. Depending on the vehicle, it may not work if there is more crewmen, for example the commander needs to issue the targeting. Remove all but gunner to make the turn towards the target work.
If commander is present in the vehicle as well, there is a chance that the vehicle will shot but not rotate the turret towards the set target.
[Unit Init + Pointer] AI Sit on Chair
Two versions of this, one for a sitting and leaning on a desk and one just sitting on any VANILLA Chair.


Code (Vanilla Chair Version):
[this,"SIT1", "ASIS"] call BIS_fnc_ambientAnim; 0 = this spawn {waitUntil {behaviour _this == "combat"}; _this call BIS_fnc_ambientAnim__terminate;}
Code (Desk Version):
[this, "SIT_AT_TABLE","ASIS",POINTERNAME] call BIS_fnc_ambientAnim;
Note:
Important!
The first version works only (as far as I know) for assets from the base game, so it may not work for chairs from different mods.
The second version, the Desk version, needs a pointer to be set (an item found in the props/empty section, ie. Look for: Pointer Cyan), and given a ID_NAME, it being POINTERNAME.
Place this pointer above the chair, as the AI will sit on the pointer in reality.
[Unit Init / AddAction] Addaction (Scroll Menu)


Code:
OBJECT_ID addAction ["NAMEOFACTION", {WHATEVERCODEYOUWANTTOEXECUTE}];
Example:
this addAction ["Tracers, Player", {BIS_tracedShooter = nil, [this, 20] call BIS_fnc_traceBullets;}];

Notes:
OBJECT_ID is the Id of the object that should have the scroll menu.
You can change OBJECT_ID to "this" for either the player or the object.
NAMEOFACTION is what will be displayed in the scroll menu.
The WHATEVERCODEYOUWANTTOEXECUTE can be anything, so just put in there what you wish the action to be, for example teleportation or changing time.
[Unit Init / AddAction] Change AI's Target
This is code comes in handy in cases of a shooting range, so you can change an AI's target.
But maybe you can think of other case uses for it as well.

Code:
OBJECT_ID addAction ["ACTION_NAME", {UNIT_ID doWatch objNull, UNIT_ID dotarget TARGET_ID;}];
Notes:
OBJECT_ID was an ID, can be set to "this" instead.
This code uses addAction, does not need to though.
ACTION_NAME can be set to any other name.
UNIT_ID is the unit doing the targeting.
TARGET_ID is the target.
[Unit Init / AddAction] Player Sit On Chair
Another one of these awefully complex codes for something as simple as sitting down on a chair.
Add this one to the chair itself. (Will only work on the ground, wont work properly on anything elevated.)


Code:
SwitchMoveFunc = { private["_object","_anim"]; _object = _this select 0; _anim = _this select 1; _object switchMove _anim; }; StandUpFunc = { player switchMove ""; player removeaction standup; }; SitFunc = { _chair = _this select 0; _unit = _this select 1; [[_unit, "Crew"], "SwitchMoveFunc"] spawn BIS_fnc_MP; _unit disableCollisionWith _chair; _chair disableCollisionWith _unit; _unit setPos (getPos _chair); _unit setPosATL (getPosATL _chair); _unit setDir ((getDir _chair) - 180); standup = _unit addaction ["<t color='#0099FF'>Stand Up</t>", StandUpFunc]; _unit setpos [getpos _unit select 0, getpos _unit select 1,((getpos _unit select 2) +1)]; _unit setPosATL [getPosATL _unit select 0, getPosATL _unit select 1,((getPosATL _unit select 2) -2)]; }; this addAction ["Sitdown", SitFunc];

Credits: MacRaes
[Unit Init / AddAction] Push Objects
Place this into any object, it will give you the option to push them.
Best use for this is to Push beached boats back into the water.


Code:
pushObject = { _object = _this select 0; _user = _this select 1; if (_user != vehicle _user) exitwith {hint "You can't push from inside the vehicle you idiot!"}; _dir = getDir _user; _dx = sin(_dir)*4; _dy = cos(_dir)*4; _object setVelocity [_dx,_dy,0]; }; push1 = [[this,["<t color=""#CC0000"">Push</t>", pushObject,[], 9,true, false, "","((vehicle _target) distance (vehicle _this)) < 8"]],"addAction",true] call BIS_fnc_MP;
Notes:
This can be abused, so be mindful of its use as players can push vehicles with broken engines...
Set the *4 to a different value to modify the strength.
Also not every object can be pushed, the ones that cannot be pushed may kill the player or ai that touches it, seems like the velocity gets stuck in the object or something.


Credits: jinkerGM
https://www.youtube.com/watch?v=p3EXvsJVHJ4
[Unit Init / AddAction] Put weapon on back
Code:
if (hasInterface) then { player addAction ["Weapon on back", { player action ["SWITCHWEAPON",player,player,-1]; }, nil, 0, false, true, "", "vehicle _originalTarget == _originalTarget"]; };
[Unit Init / AddAction] Remote Control
Code:
OBJECT_NAME addAction ["ACTION_NAME", {selectPlayer TARGET_UNIT_ID;}];
Notes:
OBJECT_NAME can be set to "this".
ACTION_NAME can be whatever.
TARGET_UNIT_ID is the unit you wish to control.

Extras:
this addAction ["Return", {selectPlayer PLAYER_ID;}];
Use this in the TARGET_UNIT's init field to be able to return to the player.
PLAYER_ID being the players id itself.
[Unit Init / AddAction] Repair and un-flip vehicle / Simple Version
Change the SET_TIME to how long the repair and un-flip must last and put it in the vehicles init field.


Code:
repairFunc = { _timeForRepair = SET_TIME; _vehicle = vehicle player; hint format ["Please wait %1 seconds for repair/flip",_timeForRepair]; sleep _timeForRepair; if (_vehicle == player) then { _vehicle = cursorTarget; }; _vehicle setfuel 1; _vehicle setdamage 0; _vehicle = nil; _vehicle = _this select 0; _vehicle setvectorup [0,0,10]; _vehicle setPos [getPos _vehicle select 0, getPos _vehicle select 1,1.5]; }; this addAction [("<t color=""#66FFFF"">" + ("Repair/Flip") +"</t>"), repairFunc,[],1,false,true];
Notes:
Just paste this code into a vehicles init field and edit the SET_TIME.

Credits: TAW DAZ
[Unit Init / AddAction] Skip Time
Code:
OBJECT_NAME addAction ["ACTION_NAME", {skipTime NUMBER;}];
Notes:
OBJECT_NAME can be set to "this".
ACTION_NAME can be whatever.
Set Skip time numerical value to skip time in that amount of hours.
[Unit Init / Addaction] Suicide Bomber Script
This is made for use by a player, its more intended to be used by a Game Master, or by remote control.


Code:
this addAction ["ㅤ","'R_80mm_HE' createVehicle position BOMBER_ID; removeAllActions BOMBER_ID"];
Note:
The activation can be seen by other players, so the name of the bomb activation is a hidden character to make it invisible.
The unit must have a unique Id, replace BOMBER_ID for that id (Variable Name).
[Unit Init / AddAction] Teleportation
Very handy for various scenarios, these are typically used on flag poles to warp from one place to another.

Code:
OBJECT_NAME addAction ["ACTION_NAME", {player setPos (getPos TELEPORT_LOCATION_OBJECT_ID)}];
Notes:
OBJECT_NAME can be set to "this".
ACTION_NAME can be whatever.
TELEPORT_LOCATION_OBJECT_ID is the ID of an object where the player will be teleported to. This can be a flag pool or a box etc.

Extras:
Use this if you want to teleport to a place that includes height. For example teleporting up to a tower:
OBJECT_NAME addAction ["ACTION_NAME", {player setPos (getPos TELEPORT_LOCATION_OBJECT_ID), player setPosATL (getPosATL TELEPORT_LOCATION_OBJECT_ID)}];
[Unit Init / AddAction + Trigger] Resupply Zone
The following codes will allow you to resupply a vehicle in a trigger zone using a prop that is given an addAction menu.

There are several versions of this script:
Repair,
Refuel,
Rearm,
Repair and Refuel,
Repair, Refuel and Rearm.

Make sure to place a trigger and give it a Variable Name. More details in the notes below.
Put the code/s into a prop, for example a box or a panel which will get the addAction menu.


Tip: You can pick & mix these scripts. So you can take say the Repair Version and Rearm Version both and have a Repair and Rearm leaving out the Refuel Option.

Repair Version Code:
this addAction ["Repair", { RepairResetTimer = YOURTIMERVALUE; RepairField = YOURTIGGER_ID; RepairChangeTime = RepairResetTimer; for "_i" from RepairChangeTime to 1 step -1 do { hint format ["Repairs in progress... Time: %1" , RepairChangeTime]; RepairChangeTime = RepairChangeTime -1; sleep 1; }; { private _veh1 = _x; _veh1 setdamage 0; } forEach (vehicles select {_x isKindOf "VEHICLETYPE" && _x inArea RepairField}); hint "Repairs are completed."; RepairChangeTime = RepairResetTimer; }];
Refuel Version Code:
this addAction ["Refuel", { RefuelResetTimer = YOURTIMERVALUE; RefuelField = YOURTIGGER_ID; RefuelChangeTime = RefuelResetTimer; for "_i" from RefuelChangeTime to 1 step -1 do { hint format ["Refueling in progress... Time: %1" , RefuelChangeTime]; RefuelChangeTime = RefuelChangeTime -1; sleep 1; }; { private _veh2 = _x; _veh2 setfuel 1; } forEach (vehicles select {_x isKindOf "VEHICLETYPE" && _x inArea RefuelField}); hint "Refueling is now completed."; RefuelChangeTime = RefuelResetTimer; }];
Rearm Version Code:
this addAction ["Rearm", { RearmResetTimer = YOURTIMERVALUE; RearmField = YOURTIGGER_ID; RearmChangeTime = RearmResetTimer; for "_i" from RearmChangeTime to 1 step -1 do { hint format ["Rearming in progress... Time: %1" , RearmChangeTime]; RearmChangeTime = RearmChangeTime -1; sleep 1; }; { private _veh3 = _x; _veh3 setVehicleAmmo 1; } forEach (vehicles select {_x isKindOf "VEHICLETYPE" && _x inArea RearmField}); hint "Rearming finished."; RearmChangeTime = RearmResetTimer; }];
Repair and Refuel Version Code:
this addAction ["Repair and Refuel", { ResetTimer = YOURTIMERVALUE; RepairAndRefuelField = YOURTIGGER_ID; RepairAndRefuelTimer = ResetTimer; for "_i" from RepairAndRefuelTimer to 1 step -1 do { hint format ["Repairs and Refueling is now in progress... Time: %1" , RepairAndRefuelTimer]; RepairAndRefuelTimer = RepairAndRefuelTimer -1; sleep 1; }; { private _veh0 = _x; _veh0 setdamage 0; _veh0 setfuel 1; } forEach (vehicles select {_x isKindOf "VEHICLETYPE" && _x inArea RepairAndRefuelField}); hint "Repairs and Refueling finished."; RepairAndRefuelTimer = ResetTimer; }];
Repair, Refuel and Rearm Version Code:
this addAction ["Repair, Refuel and Rearm", { ResetTimer = YOURTIMERVALUE; RepairAndRefuelAndRearmField = YOURTIGGER_ID; RepairAndRefuelAndRearmTimer = ResetTimer; for "_i" from RepairAndRefuelAndRearmTimer to 1 step -1 do { hint format ["Repairing, Refueling and Rearming in progress... Time: %1" , RepairAndRefuelAndRearmTimer]; RepairAndRefuelAndRearmTimer = RepairAndRefuelAndRearmTimer -1; sleep 1; }; { private _veh00 = _x; _veh00 setdamage 0; _veh00 setfuel 1; _veh00 setVehicleAmmo 1; } forEach (vehicles select {_x isKindOf "VEHICLETYPE" && _x inArea RepairAndRefuelAndRearmField}); hint "Repairs, Refueling and Rearming are now all completed."; RepairAndRefuelAndRearmTimer = ResetTimer; }];
Notes:
YOURTIMERVALUE this is how long the resupply process will take in seconds.
YOURTIGGER_ID this is the Triggers Variable Name that you must place and name.
VEHICLETYPE must be set to a vehicle type, such as Helicopter or Tank more info on this in Extras.
The resupply will only work if a vehicle is actually inside the trigger that you placed.


Extras:
To set the VEHICLETYPE you can either do (in Eden Editor):
Tools -> {} ConfigViewer or press Alt+G
to open the Config Viewer and manually look for vehicles to check the type.
Or
Right-Click (one a placed vehicle) and press {} Find in Config Viewer...
This will find the vehicle in the Config Viewer and tell you what the type is.

Important: When opening the Config Viewer, it can take a long time to load, especially if you have allot of mods. So be patient as it may appear frozen.

Examples:
M1A1 Abrams from RHS Mod:
["rhsusf_m1a1tank_base","MBT_01_base_F","Tank_F","Tank","LandVehicle","Land","AllVehicles","All"]

Mi-24 from RHS Mod:
["RHS_Mi24V_vvsc","RHS_Mi24V_vvs","RHS_Mi24V_VVS_Base","RHS_Mi24V_Base","RHS_Mi24_base","Heli_Attack_02_base_F","Helicopter_Base_F","Helicopter","Air","AllVehicles","All"]

In the M1A1 Abrams you will see "Tank" listed.
In the Mi-24 you will see "Helicopter" listed.

I will type the the vehicle types here that I looked up and can think of, but if its not listed here check the config viewer or the link below to see if you can find it.
Types:
Car Motorcycle Tank StaticWeapon Helicopter Plane Ship Building Thing

You can also check out this link to find the vehicle types:
https://arma.fandom.com/zh/wiki/ArmA:_CfgVehicles

Special Thanks to pierremgi
from https://forums.bohemia.net/ for helping me with the creation of these scripts.
[Unit Init + Trigger + Marker] Placing a Tracking Marker on a Unit
This will place a marker on a unit so that it tracks the unit on the map.
You will need to set a marker, and a trigger for this and set the MAP_UPDATE_TIMER_VALUE value of how often you want the marker to update itself.


Marker:
TRACKER_MARKER
Trigger:
Condition:
!alive UNIT_TO_BE_TRACKED
Activation:
deleteMarker "TRACKER_MARKER";
Unit Init Code:
[] spawn { while {not isnull UNIT_TO_BE_TRACKED} do { "TRACKER_MARKER" setmarkerpos getpos UNIT_TO_BE_TRACKED; sleep MAP_UPDATE_TIMER_VALUE; }; };;
[Trigger] Countdown and execute a function using a if statement
Code:
custom_timer = SETYOURTIME; tList = list TRIGGERNAME; VARNAME =[] spawn { while {custom_timer > 0} do { custom_timer = custom_timer - 1; hint str custom_timer; uiSleep 1; }; if (custom_timer isEqualTo 0) then { WHATEVEVER_CODE_YOU_WANT_TO_ACTIVATE }; };
Notes:
this list wont work since its outside of the codeblock, so you have to lable the TRIGGERNAME,
which is defined here as "tList", acting as thislist inside the "Code Block", this has to be done due to the uiSleep or sleep function which for reasons yet unknown to me, wont work outside such a block.
[Unit Init] and [Trigger] Create a Inventory Stash
This code will allow you to set any item, or object, anything really to have an inventory where equipment can be stored.
Useful for setting certain boxes to be able to hold cargo, or to make unsuspecting props like a prison cell toilet to become a hidden stash.


Unit Init Variant
_cargo = "Supply500" createVehicle [0,0,0]; _cargo attachTo [this, [0,0,0.85]]; this addEventHandler ["Killed", { { detach _x, deleteVehicle _x; } forEach attachedObjects (_this select 0); }];


Trigger Variant
Condition:
true
On Activation:
EquipmentCrate = "Land_WoodenBox_02_F" createVehicle position thisTrigger; _cargo = "Supply500" createVehicle [0,0,0]; _cargo attachTo [EquipmentCrate, [0,0,0.85]]; EquipmentCrate addEventHandler ["Killed", { { detach _x, deleteVehicle _x; } forEach attachedObjects (_this select 0); }];

Notes:
For the Unit Init variant its a simple case of copy and pasting the code onto an existing prop.
For the Trigger variant you can change the item that is to be spawned, this example code uses "Land_WoodenBox_02_F", look for any prop and find its Classname, and simply replace the prop names.
[Trigger] Creating Mist/Fog
Condition:
true
On Activation:
5 setFog [1, 1, 10]
[Trigger] Damage or kill player/AI in trigger
Useful for creating a limited play area.

Code:
{_x setDamage 1} forEach thisList;
Note:
1 = 100% damage, 0.5 = 50% damage, etc.
[Trigger] Death Counter
This is a useful code which will count the amount of dead / killed units on a side that you can select.
So for example you can count how many civilians were killed, and if a certain threshold is met, you can activate another code, say a lose condition.

Condition
true
On Activation:
SideIs = XSIDEX; [] spawn { while {true} do { DeathCounter = {getNumber (configfile >> "CfgVehicles" >> typeOf _x >> "side") == SideIs} count allDeadMen; sleep 1; }; };
Notes:
Change XSIDEX to a number, from 0 to 3:
0 = East, 1 = West, 2 = Independent, 3 = Civilian
This code on its own does nothing more than count the number of dead, use it in combination with other codes.

Extra:
Paste this code just under sleep 1; to have a constant reading of how many are killed on a side.
hintSilent format ["Killed: %1",DeathCounter];

Credits: Pierre MGI
[Trigger] Ending a mission
Set a condition, that could be for example a unit dying, and then add the following into the on activation:

On Activation:
call{endMission "END1";}
[Trigger] Spawn Equipment On Trigger
With this code you can add spawn any equipment on the trigger.
Set the conditions to suit your needs.

On Activation:
Equipment = "U_C_Poloshirt_blue"; EquipmentSpawner = "WeaponHolderSimulated" createVehicle [0,0,0]; EquipmentSpawner setVariable ["BIS_enableRandomization", false]; EquipmentSpawner setPos (getPos thisTrigger); EquipmentSpawner addItemCargo [Equipment, 1]; EquipmentSpawner setDir floor (random 359);
Notes:
Change at the very top, the Equipment = "U_C_Poloshirt_blue"; to what you wish to spawn.
Place an item/equipment in Eden Editor and hover over it to get the class name of the item.
[Trigger] If Unit Is Dead
This is very much like a if statement, if a unit dies then do X.

Condition Code:
call{!alive TARGET_UNIT_ID}
On Activation:
WHATEVERCODEYOUWANTTOEXECUTE
Example:
On Activation:
call{Hint "Colonel is dead!"}
[Trigger] If Losses are too great
This code is useful when one side takes too much losses.
Unlike the "[Trigger] Surrender after casualties" code, this checks for all of the units on a given side.
So it does not merely check for a single squad but the entire western or eastern side is counted and they take a certain amount of casualties you can execute a code of your choice.

Condition:
_Counter = XSIDEX countSide allUnits; LOSSES > _Counter
On Activation:
WHATEVERCODEYOUWANTTOACTIVATE
Notes:
XSIDEX is the side you want to count, set this to west or east for example.
_Counter counts all the units on the side you set in XSIDEX.
LOSSES set this to the number of dead units to compare with _Counter.

So if a force of 20 come at you from say the eastern side and you set LOSSES to 15, once you killed 15 units of the eastern units, you can activate a code. This could be for example a win scenario condition.


Extra:
Non-Trigger Version
_Counter = XSIDEX countSide allUnits; if (LOSSES > _Counter) then { WHATEVERCODEYOUWANTTOACTIVATE; };
[Trigger] Modifying a players stats
Here are some stuff you can put into a trigger to modify a players or units behaviour and stats.
*Ignore the picture here, originally I had this set as a Unit Init, but a Trigger works better.


Condition:
true
On Activation
waitUntil {!isnull player}; UNITNAME enableStamina false; UNITNAME setCustomAimCoef 0; UNITNAME setAnimSpeedCoef 1.25; UNITNAME addEventHandler ["Respawn", {player enableStamina false}]; UNITNAME addEventHandler ["Respawn", {player setCustomAimCoef 0}]; UNITNAME addEventHandler ["Respawn", {player setAnimSpeedCoef 1.25;}];
Notes:
Set the Trigger: Timer, Timer Values Min 5, Mid 5, Max 5
For some reason, this code does not want to work if its activated right away, so some 5 seconds delay fixes that.

Extra info:
enableStamina = Have or not have stamina system.
setCustomAimCoef = Weapon Sway, 0 being none.
setAnimSpeedCoef = Speeds up the animations overall, but also increases movement speed.
[Trigger] Play Zone Area
Use this code to set up a limited play area, a bounding box that if the player leaves, will kill them after a set of time.
Simply set the trigger size and timer found inside the deactivation code.
Read the notes below for more information.

Variable Name:
playableArea
Condition:
this && player in thisList
On Activation:
playableInZone = true;
On Deactivation:
killFunc = {player setDammage 1;}; OutOfZoneFunc = { custom_timer = 10; if (playableInZone) then { VARNAME =[] spawn { while {custom_timer > 0} do { custom_timer = custom_timer - 1; uiSleep 1; hint format ["You Have %1 Seconds To ReEnter The Playable Area", custom_timer]; backInZone = [playableArea, player] call BIS_fnc_inTrigger; if (backInZone) exitWith {hint "Back In Zone"; keepAlive = true;}; if (custom_timer == 0) then {call killFunc;}; }; }; }; }; call OutOfZoneFunc;
Note:
Dont forget to name this trigger as well as set its size.
Inside the "On Deactivation" code, you will find custom_timer, this is currently set to 10, meaning the player that is outside of the zone will die in 10 seconds.
Change this to suit your needs.
This wont work with helicopters..
[Trigger] Open / Close Gate
This is meant for gates or road block bars, if you drive into the triggers field it will open, when you leave it, it will close.


On Activation:
OBJECT_ID animate ["Door_1_rot", 1]
On Deactivation:
OBJECT_ID animate ["Door_1_rot", 0]
Notes:
Set the size for the trigger, set Activation to AnyPlayer, Activation Type to Present. Tick Repeatable.
This works for anything that can open/close.
[Trigger] Random Time and Weather Conditions
A simple script that randomises the the time and weather conditions upon mission start.
Adds more unpredictability and variety.

Condition:
true
On Activation:
randomizer = random 1.00; randomTime = random 12; skipTime randomTime; 15 setFog randomizer; 60 setRain randomizer; 60 setOvercast randomizer; setHumidity randomizer;
Notes:
The two main things that control the randomisation here is the "randomizer" and "randomTime".
For randomzier 0 means nothing will get changed, 1.00 means it can go to 100%.
So if you want the weather to get only slighty worse, set it to a low value like 0.20

randomTime will just skip time between 0 and 12 hours in this case. So whatever your starting time is, it will add up to 12 hours onto it. Feel free to change this to suit your needs.
[Trigger] Surrender after casualties
This is for a single squad, so copy paste and change the SQUADNAME for each Squad, and make a trigger for each of them, and make sure to change the Squads ID accordingly.

SQUADNAME here is referring to the Groups Variable Name, to access the group settings press on the Icon of the group (not to be mistaken with the Group Leaders settings) as seen in the image below:


Condition:
({alive _x} count units SQUADNAME) < LEFTUNITS
On Activation:
{ _x setCaptive true; _x action ["Surrender", _x]; } forEach units SQUADNAME;

Notes:
Whatever you set the SQUADNAME as for the group, put the same name/ID into the trigger.
LEFTUNITS is the remaining number of soldiers in the squad, if they have less than this they will give up.
So if there is 5 Soldiers and you set LEFTUNITS to 3, if there is Less than 3 soldiers left in the unit they will surrender, in this case the remaining two soldiers will surrender.
[Trigger + Music Folder + .OGG File + description.ext] Playmusic


description.ext file code:
class CfgMusic { sounds[] = {01,02}; class 01 { name = "01"; sound[] = {"music\YOURMUSIC1.ogg", db+10, 1.0}; titles[] = {0,""}; }; class 02 { name = "02"; sound[] = {"music\jYOURMUSIC2.ogg", db+10, 1.0}; titles[] = {0,""}; }; };
Trigger:

Condition:
true
On activation:
0 fademusic 1; playmusic "01";
Notes:
You need to create a folder called "music" in the mission folder found in documents/arma3
You need to create a discription.ext (can be opened with notepad)
In there you need to reference the music file.
MUSIC FILES ONLY WORK IF THEY ARE .OGG FORMAT!
"01" is the song name. (Defined in the discription.ext)
This uses the ingames Music Volume.
Make sure you do NOT have the music off!
[Trigger + Music Folder + .OGG File] Loop 3D Music
Best way to understand 3D music is to think of a Radio in game, its the source where the music/sound is coming from, and the closer you get to it the louder it gets.
This script will allow you to loop a soundtrack from a trigger.

Condition:
true
On Activation:
nul = [this] spawn { private _path = getMissionPath "\Music\YOURMUSICFILE.ogg"; MusicLength = XXX; MusicRange = XXX; while {true} do { playSound3D [_path, SOURCEOBJECT, false, getPosASL SOURCEOBJECT, 1, 1, MusicRange]; sleep MusicLength; }; };
Notes:
This code assumes you have a folder named "Music" in your mission folder,
if you dont have any, create one.

Ex.
C:\Users\YOURPCNAME\Documents\Arma 3\missions\YOURMISSIONNAME.MAPNAME\Music
Place your music or sound files into the Music folder.

YOURMUSICFILE (to my knowledge) has to be a .OGG format.
Rename this to whatever you music's name is.

At MusicLength replace the XXX's with how long your music is (in seconds)
At MusicRange replace the XXX's with how far you want the music to be heard,
if you type in 100, that is about 10 meters, so multiply any meters by 10.

Replace SOURCEOBJECT with the Variable Name for either the Trigger itself or a different object.

If you are having issues, the ones that I personally run commonly into is having my in game music turned off, so make sure that is on, and double check if you can open your .ogg files with a trusted music player to ensure that the .ogg works fine.
[Trigger + Video Folder + .OGV File] Playing a Moive
Play a cutscene using a trigger.


On activation:
call{["VIDEOFOLDER\VIDEONAME.ogv"] call BIS_fnc_playVideo;}
Notes:
Make sure to create a movie folder in the mission folder, also the format has to be .ogv
Lastly make sure that there is timer activation's for other triggers to not interrupt the cut scene, or end other stuff before playing it.


Example:
Folder
C:\Users\YOURPCNAME\Documents\Arma 3\missions\YOURMISSIONNAME.MAPNAME\music

Music File
YOURVIDEOFILE.ogv

Extras:
Use this site to convert mp4 or other formats into .ogv
https://convertio.co/mp4-ogv/
[Trigger + Markers] Spawn Enemy Group and give them waypoints
You will need to place a trigger and marker/s for this one.
marker_Destroy listed below in the code is the Marker's ID, meaning it is the waypoint that the spawned in units will go towards.


Trigger:

Condition:
true
On Activation:
randomAmbush = [ "SPAWN_LOCATIONS_1","SPAWN_LOCATIONS_2", "SPAWN_LOCATIONS_3" ] call BIS_fnc_selectRandom; UNITS_TO_SPAWN = [getmarkerpos randomAmbush, SIDE, [ "UNIT_CLASS_1", "UNIT_CLASS_2", "UNIT_CLASS_3" ] ,[],[],[],[],[]] call BIS_fnc_spawnGroup; wp1 = UNITS_TO_SPAWN addWaypoint [getmarkerpos "marker_Destroy", 0, 25]; wp1 setWaypointType "MOVE"; wp1 setWaypointBehaviour "SAFE"; wp1 setWaypointSpeed "LIMITED";
Notes:
randomAmbush can be renamed.
SPAWN_LOCATIONS_1 is one of the spawn points, you can add here as many as you want.
SIDE needs to be set to west or east etc.
UNIT_CLASS_1 is the units class id that is to be spawned, more details on that in the extra section.
In wp1 the 25 is the random placement radius of the waypoint, so a higher number means more randomness while 0 is dead on.
wp1 also is set to look for marker_Destroy, wherever this marker is placed is where the spawned units will go.
Change the Type, Behaviour and Speed as need be.


More information found here:
https://community.bistudio.com/wiki/setWaypointType
Also search for setWaypointBehaviour, setWaypointSpeed or anything else you wish to add that is relevant to setWaypoint.

Extras:

The classname of a given unit can be seen by simply hovering over the unit, or
Right-Click (the unit)-> Log -> Log Classes to Clipboard.
If you logged it to the clip board, press CTRL+V to paste the Classname.
[Trigger + Module] Activating a Module via AddAction (Trick)
This is very unorthodox way of activating a Module with a Trigger using a AddAction.
For this one I need to go into detail of how it all works, so you can use this method of activation for any other types of modules besides the one that is going to be used as an example which is presented here.

This example will use the "Show / Hide" Module.

First place two of these modules.
In their Attributes field, set one of them to "Hide Units" and the other to "Show Units".
Next Sync them both to the object that is to be first hidden and then unhidden.

Place a trigger next and add this in its condition field:

Condition:
!alive DESTROY_PROP;

Next Sync this trigger to the Show / Hide Module that is set to "Show Units".

Place a prop down (anything will do) and call it DESTROY_PROP as its variable name.

Next place a another prop or select yourself for the AddAction and place this into the Initfield:
Init:
this addAction ["UNHIDE", {deletevehicle DESTROY_PROP}];

Now when you run the game and use the addaction menu and select UNHIDE it will delete the prop you set and named DESTROY_PROP, the trigger that we set will now become activated since it detects that the prop called DESTROY_PROP no longer exists with its condition being !alive DESTROY_PROP thus activating the trigger which is synced to activate the module.

Notes:
This code is set up for the Show / Hide Module, but if you understand how it works you can change that module to anything else.
Rename UNHIDE of course to whatever your doing if you changed the module that is to be activated.
Also note that you dont really need to have a module with this method, you can also just use this to activate a trigger alone.
[Waypoint Init] Delete Unit upon reaching waypoint
This is good to use for cinematic stuff, like have a plane fly by and then get rig of it once its in the distance.

Code:
deleteVehicle (vehicle this);{deleteVehicle _x} forEach thislist; deleteGroup (group this);
Note:
Copy and paste this into a waypoints init field.
[Extended Debug Console] Get Nearest Object Classname
This code is useful for figuring out an objects ID nameclass, to later then be found or used.


Code:
nearestTerrainObjects [player, ["Tree", "Bush"], 200];
Alt Code:
nearestObjects [player, [], 10];
Extras:
More documentation on this code, for various key words:
https://community.bistudio.com/wiki/nearestTerrainObjects
[Extended Debug Console] Get pressed keyboard key number
This will tell you the key number which is pressed via a hint.

Code:
moduleName_keyDownEHId = findDisplay 46 displayAddEventHandler ["KeyDown", "hint str _this;"];
[Extended Debug Console] Get Unit Combat Behaviour
Code:
unitCombatMode UNIT_ID;
Note:
This will tell you a units behaviour, the default is "Yellow"
More info found below:
https://community.bistudio.com/wiki/Combat_Modes
[init.sqf + code.sqf] Cash / Point System
I could not figure out how to make this one work without using a .sqf file since the variable for the money needs to be stored somewhere.
But since its a very useful system I must include it into this guide as it opens up many possibilities.

The ini.sqf needs to be in the mission folder:
C:\Users\YOURPC\Documents\Arma 3\missions\YOURMISSIONNAME.MAPNAME

And the subtractCash.sqf in this case is placed in a subfolder called Scripts
C:\Users\YOURPC\Documents\Arma 3\missions\YOURMISSIONNAME.MAPNAME\Scripts

The code.sqf in this example will be called subtractCash.sqf

init.sqf
cash = XXX; OBJECTID addAction ["Count Cash", {hint format ["Cash: %1", cash];}, [], 6]; OBJECTID addAction ["PURCHASE_ITEM (Cost XXX)", {[] execVM "Scripts\subtractCash.sqf";}, [], 5]; OBJECTID addAction ["Add Cash (+XXX)", {cash = cash + 10; hint "Cash +XXX";}, [], 4];
subtractCash.sqf
_cost = XXX; if (cash >= _cost) then { cash = cash - _cost; hint "Cash Taken"; EXECUTE_ACTION; } else { hint "Not enough cash!"; };

Notes:
Starting with init.sqf,
OBJECTID can be an object or set it to player if you so desire.
XXX Wherever these are, replace them with the numerical values you need, them being the starting money and costs.
PURCHASE_ITEM, replace this with the item that is to be sold.
You can pick and mix what you need from this code, for example, you dont need to have the Add cash section as well if you dont want it, just remove it from the code.

This is probably not the most elegant way of doing things but for each Purchasable Item you can add a new .sqf to load.
So in this line:
{[] execVM "Scripts\subtractCash.sqf";}
The subtractCash.sqf could be something like AK74Cost.sqf and set up the cost and code to add the player a AK.

Next is subtractCash.sqf,
XXX Here you assign the cost for a item or anything really.
EXECUTE_ACTION can be anything you want, for example:
player addweaon "WeaponClassName";

Feel free to also rename cash to money or points etc.


Extra:
Credits: h8ermaker
https://www.youtube.com/watch?v=ZtFVCXFtmDc
[description.ext + init.sqf] Multiplayer Custom Class Roles
Using these codes will allow you to have Combat Roles, if you are familiar with the Battlefield Games, you have roles such as Medic, Support, Engineer, Recon etc, this is something similar to that where you can build first using the Arsenal your soldiers that are to be used, and then have them be available for selection either on mission start or upon respawning after the player is killed.

This one is a bit more complex than the rest of the codes listed in this guide.
There is unfortunately no way (to the best of my knowledge) to make this work within Eden Editor alone.


Important:
Check the bottom section for further information found under Credtis.

init.sqf
[XSIDEX, "Alpha1"] call BIS_fnc_addRespawnInventory;
description.sqf
// START OF XSIDEX RESPAWN LOADOUTS respawnTemplateXSIDEX[] = {"MenuPosition", "MenuInventory"}; // Player loadouts class CfgRoles { class CLASSTYPENAME { displayName = "CLASSTYPENAME"; icon = "\Images\IconsTemplateTest.jpg"; }; }; class CfgRespawnInventory //config that calls in game respawn load-outs { //******************* // XSIDEX EQUIPMENT //******************* class Alpha1 //Classification for init.sqf { TOOLS->LOADOUT_TOOLS->EXPORT_LOADOUT(CfgRespawnInventory) }; };
Notes:
"Alpha1" is found in both the description.ext and init.sqf you can add more like alpha2, bravo1 etc.
XSIDEX change this to west or east etc.
CLASSTYPENAME, call this something relevant like, Assault, Sniper, Riflemen, AT Soldier etc.

TOOLS->LOADOUT_TOOLS->EXPORT_LOADOUT(CfgRespawnInventory)
Within Eden Editor, Select a Soldier, that you have prepared using the "Edit Loadout" (Using Arsenal), and then do exactly that,
go to the top tabs and find: Tools, Loadout Tools etc.
Once you do that, it will save the information to the clipboard.
Then paste that and overwrite TOOLS->LOADOUT_TOOLS->EXPORT_LOADOUT(CfgRespawnInventory) with it.
Please read the Extra section for important information on this.


Extra:
Here is an example code of
TOOLS->LOADOUT_TOOLS->EXPORT_LOADOUT(CfgRespawnInventory)
class Alpha1 //Classification for init.sqf { TOOLS->LOADOUT_TOOLS->EXPORT_LOADOUT(CfgRespawnInventory) };
Becomes something like this (Depending of course on your personal loadout):
class Alpha1 //Classification for init.sqf { displayName = "Rhodesian Rifleman"; icon = "IconsTemplateTest.jpg"; role = "Assault"; show = "true"; uniformClass = "U_I_L_Uniform_01_deserter_F"; backpack = ""; weapons[] = {"CUP_arifle_FNFAL5061_wooden", "rhssaf_zrak_rd7j", "Throw", "Put"}; magazines[] = {"murshun_cigs_cigpack", "murshun_cigs_matches", "CUP_20Rnd_762x51_FNFAL_M", "CUP_20Rnd_762x51_FNFAL_M", "CUP_20Rnd_762x51_FNFAL_M", "CUP_20Rnd_762x51_FNFAL_M", "CUP_20Rnd_762x51_FNFAL_M", "CUP_20Rnd_762x51_FNFAL_M", "CUP_20Rnd_762x51_FNFAL_M", "rhs_mag_m67", "rhs_mag_m67", "rhs_mag_m67"}; items[] = {"PiR_bint"}; linkedItems[] = {"rhsgref_alice_webbing", "H_Booniehat_oli", "", "ItemMap", "ItemCompass", "ItemWatch", "ItemRadio", "ItemGPS", "", "", "", "", "", "", "", ""}; };
In this example code, the displayName will be shown within the game. Set this to what you wish.
Also change the role to whatever you set as the CLASSTYPENAME.

In Eden Eden Editor place a marker and call it respawn_XSIDEX
XSIDEX being the side of course, so for example respawn_west or respawn_east
Next go to Attributes->Multiplayer (found at the top tabs in Eden Editor) and set it up to have:
Respawn = Respawn on Custom Position
Ruleset = Select Respawn Loadout, Select Respawn Location.

Important!
You will only get the Loadout Selection upon respawn, and it has to be in Multiplayer, so you first need to get killed or press Esc -> Respawn to get the menu.
If you want to select your Loadout right from the start, add this to the discription.ext as well:
respawnOnStart = 1;

Credits: Shy
While I did my best to make this as easy to understand as possible, you definitely want to check out Shy's guide which is allot more in-depth and will help you understand everything what is going on in much more detail.
https://steamcommunity.yuanyoumao.com/sharedfiles/filedetails/?id=2725594828
[Universal] Countdown Timer
Code:
custom_timer = 10; VARNAME =[] spawn { while {custom_timer > 0} do { custom_timer = custom_timer - 1; hint str custom_timer; uiSleep 1; }; };
Notes:
You can add additional functions by doing a if statements.
[Universal] If Statement
This is just a simple script for its proper format, I keep forgetting how to write it properly without it giving me errors so I included it here.

Code:
if (!alive this) then { hint "I'm dead" ; };
Alt Code
if (TIME < 5) then { YOURCODE; };
Note:
The structure of the syntax is important here. Doing checks requires brackets.
[Universal] Giving Multiple Objects to a forEach command
I found it a bit tricky to figure out how to give multiple objects into a forEach command as Lists wont work and you will get an error saying that an Array/List has been provided but an object is expected.
So here is one way of doing this without getting that error.

Code:
Object1 = Whatever; Object2 = Whatever; Objects = Object1 + Object 2; { _Anything = _x; _Anything whateverYouWantToDo; } forEach Objects;

Notes:
This ones more just a personal reminder than anything else, but perhaps it may be of help to you as well if you ran into this problem yourself at some point.

Credits: killzone_kid from https://forums.bohemia.net/
[Universal] How to use sleep
This $%&4! gives me constantly issues, it must be structured like the code below for it to work properly.

Code:
VARNAME =[] spawn { sleep 1; hint "Sleep"; };
[Universal] Random Chance Code Activation
Here is a way of activating code depending on the probability you input.

Code:
rChance = random 100; if (PERCENTAGE > rChance) then { EXECUTEWHATEVERYOUWANT; };
Notes:
Whatever you set PERCENTAGE to is the chance the code will be run.
So setting it 10 means there is a 10% chance it will run.
rChance is set to random 100 but you can change 100 to anything really.


Extra:
If you want to see what the randomly selected number was, use this code:
hint format ["Chance = %1", rChance];
[ACE] Point Finger
This is a specific code for ACE.
The Ace "Point a Finger At" feature can only be used if a module has been placed in Eden Editor, however, if you are playing a game mode, say Antistasi or Liberation and it does not support ACE natively, you can still enable this feature as long as you have access to the debug console (Usually this is reserved for the Host and Admins).
Access the Debug Console and run the code below to enable Ace Point Finger.

Code:
ace_finger_enabled = true; ace_finger_maxRange = 4;
Notes:
You can change the maxrange to something higher or lower.

Credits: xJenny99 from Reddit
[initPlayerLocal.sqf] Tab Key Inventory
I had to include this one, this allows you to use the "Tab" key as the inventory button like in DayZ.
If you set the Inventory button in the options, found under the Common section, as Tab, it will open it, but you cannot close it again with the same key. This code allows you to press Tab again to close it.

Code:
player addEventHandler ["InventoryOpened", { _this spawn { waitUntil { not isNull (findDisplay 602) }; INVCLOSED = (findDisplay 602) displayAddEventHandler ["keydown", { if ((_this select 1) in (actionKeys "gear")) then { (findDisplay 602) displayRemoveEventHandler ["keydown",INVCLOSED]; closeDialog 0 } }] } }]
Notes:
Save your mission, then find it in your documents folder under
C:\Users\YOURPC\Documents\Arma 3\
in either "missions" or "mpmissions" then open YOURMISSIONNAME.
In there create a new text file and call it initPlayerLocal
Now copy the code in there and save it.
Change it from a .txt to .sqf.

Important: Make sure its a .sqf in some cases people forget this and its a .sqf.txt at the end.


Credits: das attorney
.SQF Related
While I try to limit this guide to using triggers and initialisation fields, there are cases where not using external .sqf files is just not possible or feasible.

Here I wish to list some basics which is often used when working with .sqf files.

Types of .sqf files:
There are various .sqf files that will get activated based on how they are named.

https://community.bistudio.com/wiki/Event_Scripts


Useful commands:
Execute .sqf file (mostly for init.sqf)
How to run another sqf from either the init.sqf or a different .sqf file.
execVM "YOURFOLDER\FILENAME.sqf";

Separate .sqf files
When your code gets to large, consider chopping it up and simply adding it to another file and then including it into your larger .sqf file.
#include "FILENAME.sqf"

Commenting out
To disable code or add in notes.
/* In between these, everything becomes a comment. */
// After these, everything becomes a comment.

For Loop
Proper construction of a for loop.
for "_i" from 1 to 10 do { ANYCODE; };
Non-Coding Related
I will use this section here to add in other topics that revolve around Eden Editor that are not coding related but good to keep in mind and to take advantage of.

Multiplayer Related
I will post here some information about features or functions that are often used when setting up a multiplayer mission. Consider this more of a checklist than anything, good for a quick glace.

Respawn Markers
In order to be able to respawn in a Multiplayer mission, you will need to set down a Marker and Name it. This here is a very simple method and serves only as a basis for respawning

If a player is killed, they will respawn on the marker's location.
Name the marker accordingly depending on the factions that can respawn:
respawn_west, respawn_east, respawn_guerrila, respawn_civilian


Modules
Modules are found in the Systems Tab (F5) under the Module Section.

Cover Map Module
I find this Module very helpful to set a limited play area.
It will only darken the rest of the map besides the X and Y values that you set as the playable area.
It wont do anything besides darken the rest of the map so to warn the players that they are leaving the playable area you must use a trigger and cook something up in there.

Show / Hide Module
This module will make things invisible, disable their simulation and collision.
Useful as a means to "Loading in" stuff.

You need to place two of these, and set one of them to "Show Units" and the other to "Hide Units" which is done by modifying the settings in their Attributes Field..
Sync them both to everything that is to be hidden first and shown later.
Next place a trigger, set the conditions as you please and sync the trigger to the Show / Hide Module that was set to "Show Units", now if the triggers conditions are met, the units or props that were set hidden now become activated and visible, loaded in so to speak.

Tools
I will add here some external tools that are pretty useful to have quick access to.

Online Notepad
Useful for not needing to tab out
http://justnotepad.com/

Bohemia Interactive Editing Wikis
Quick access to Scripting Commands and Scripting Functions
https://community.bistudio.com/wiki/Main_Page
https://community.bistudio.com/wiki/Event_Scripts

Text Color Picker
Useful for setting text colors of Hints and addAction etc
https://www.w3schools.com/colors/colors_picker.asp

(WIP)
Will add in more later on as I discover other things worth mentioning.
Final Words and some Extras


Shout outs to Larrow from https://forums.bohemia.net/
I have come across his posts very often when searching for solutions and he never fails to deliver. He is a big help to the community and since his scripts saved me countless hours and many frustrations he really deserves a mention. If you happen to read this Larrow, I just want to say, Thank You For Everything!

Since I made this compilation of scripts over the years, I dont know where I pulled most of them, even though I modified more often than not the codes, if you recognise something to be your code, do give a shout-out and I would gladly credit you.

Also I found this guide just recently after I written my guide, and it has some useful scripts as well, so I would like to add this here since its worth having a look:
https://steamcommunity.yuanyoumao.com/sharedfiles/filedetails/?id=1635452218

Thank you for reading this guide, I hope it has proved to be useful and helpful,
if it has, consider giving it a Rating so others can find it more easily as well.


Best of luck with your mission creation. o7

21 条留言
PepsiWizard 2023 年 3 月 1 日 下午 4:10 
based stink bomb pic
Gideon 2022 年 5 月 30 日 下午 5:38 
Hey no problem, thanks for taking it for consideration :steamthumbsup:
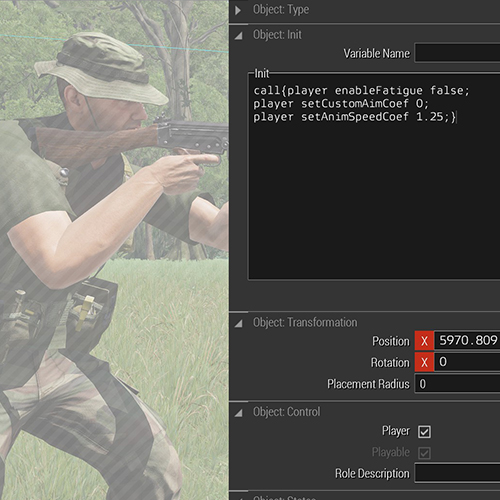
There was in fact a working script for this, in the bohemia forums. It worked like a charm and it was a script that was applied to the helicopter and the pilot via add action.
I no longer have the specific thread bookmarked, but it no longer works, and was a crude implementation, it didn't work on the kajman for example.

Maybe BI really wants the heli to be flown coop, I searched to my abilities and all I could find was that script, and been searching for a similar one that would work on current versions

The way the script worked was along the lines of giving the pilot a gunner camera, basically slaving the turret like when you press ctrl + right mouse on the planes TGP, via an add action command. Maybe that hint will help you.
XallZall  [作者] 2022 年 5 月 30 日 下午 5:26 
@Gideon
That is an interesting request, would make a nice addition.
However I do not want to give any hopes and will just be honest with you that I have no idea how I would do that.
I would have to invest time into researching and figuring that out, and as I am currently working on many different coding related projects so if I did add something like this it would be far in the future.

I may come back to this but do not count on it, I would recommend you to check the BI forums if there is something out there like this and if not, ask your question there at https://forums.bohemia.net/
usually the lads there really know their stuff and may be up for a challenge.
Thank you for your suggestion and apologies that I am not able to help with this request.
Gideon 2022 年 5 月 30 日 下午 1:43 
Can you add a script similar to solo tank, but for helicopters?
Especially attack helicopters like the Apache and the Kadjman, would be cool to control only pilot and when changing to the gunner have full control of the cannons and guided missiles.
Currently with your scrip the helicopters hoover and descend to a low altitude when changing from piloting to the gunner.
XallZall  [作者] 2022 年 5 月 13 日 上午 4:16 
And I found it by searching for "Soldier on computer".
As that is who this guide was made for, us Arma players who happen to also code and create missions. Hope that helps!
XallZall  [作者] 2022 年 5 月 13 日 上午 4:07 
The source of the first image in my guide is clearly you ケン - ken :P

But honestly I been trying to find it myself.

Apparently its from a Japanese Animation Film called "Memories" made in 1995.
But I have yet to watch it and find the scene.
I got this info from searching the image on google and some forum where someone else asked the same question.

So for all I know they could be entirely incorrect, but its my best guess for the time being that its from Memories 1995 as I didnt find any other information when reverse searching the image.

If you do happen to find it yourself, do let me know, I would love to know this myself.
ken ga kirai 2022 年 5 月 13 日 上午 12:54 
What's the source of the first image on your guide?
BladeForged †♱☦ 2022 年 5 月 12 日 下午 9:01 
Very useful now i don't have to remember code bits every time i start making a mission to never finish i can just copy and paste
XallZall  [作者] 2022 年 4 月 30 日 上午 7:37 
A little update to everyone, since the amount of codes have been growing and this its more difficult to navigate or find a code:

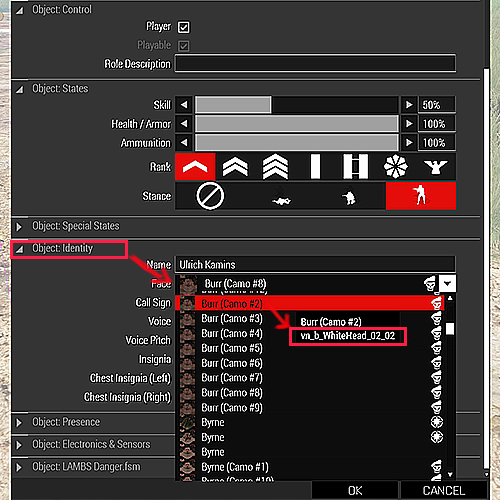
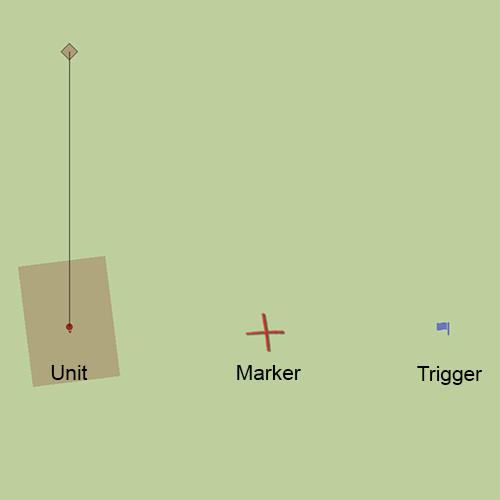
I restructured the sections, so that its more alphabetically sorted.
Its based also on sections, so the Unit Inits are alphabetically sorted and the Triggers as as well.

Just writing this as some may get confused or think certain codes have been deleted, its just restructured.:mhwgood:
XallZall  [作者] 2022 年 4 月 25 日 上午 5:11 
@Spag
Your welcome, I also updated the section there now to make it a bit more clear.
Good luck with your mission : )